Installing a template into our Site Builder requires an html editing program such as Dreamweaver or an editor of your choice. You will need to add place holders to the design in order for the site to function correctly. The following tutorial explains what the place holder codes are all about and will give you a general idea of where to place them. There is a complete list of placeholder codes inside the storeadmin area. You can find this list by Website / Template and click on the link that says "Add A Custom Theme" then click the link that says "Site Include Codes".
Everything you put into the template itself will cover all pages of your site.
Note: Whether the template is being installed on a temporary URL or permanent URL you can use %SITE_URL% placeholder code within the html itself for all images.
So, instead of using http://www.domainname.com/images/imagename.jpg or http://www.domainname.com/images/foldername//imagename.jpg you would use:
%SITE_URL%/images/imagename.jpg or %SITE_URL%/images/foldername/imagename.jpg
FYI: You will need to log into your CPanel or use an FTP program to upload your folder of images into the public_html / images folder online. Then you can use the placeholder code as shown above. All images for the template itself will show up once the design is installed.
First lets look at the only place holder codes that actually go inside the html part of your design. Don't worry, you will not have to actually have to mess with the html portion of your design after these first three place holder codes. You cannot just put these three place holder codes at the top of your design. You actually need to access the html and add them there. They go in the head tag of your html code. The entire head tag code for your site will look like the example below when you're finished.
 |
Copy the html below <head> <title>%TITLE_TAG%</title> %META_TAGS% %STYLE_SHEET% </head> |
Title Tag (%TITLE_TAG%) - This place holder code goes in between the title tag portion of your html code. (no spaces). If you click on Site Settings inside of the admin area you will notice a "company name" written in the box provided. This title shows up in the title bar at the top of the web browser (it helps search engines when they come to crawl a site and index it).
Meta Tags (%META_TAGS%) - This place holder code is VERY important for search engine optimization. This tag takes care of whatever goes into the keyword and meta description boxes for your site and helps search engines crawl and index your site. This place holder code goes directly underneath the Title Tag code.
Style Sheet (%STYLE_SHEET%) - This place holder code allows you to use the fonts and colors portion of the storeadmin to control the default font, text size and color scheme of your site. It also helps our software to insert a script into the cart page that keeps the cart from bringing in your whole website (template included) into that page. And it helps to make the view of what is in the cart, accurate. This tag goes directly underneath the Meta Tag code.
IMPORTANT: The style sheet code %STYLE_SHEET% also works with other parts of the site than just the template font styling so it must be added even if you choose to use your own stylesheet.
If you have your design already laid out, you just need to add placeholder codes to make that template work with PappaShop's Website Manager. Let's move on to the placeholder codes and what they're for.
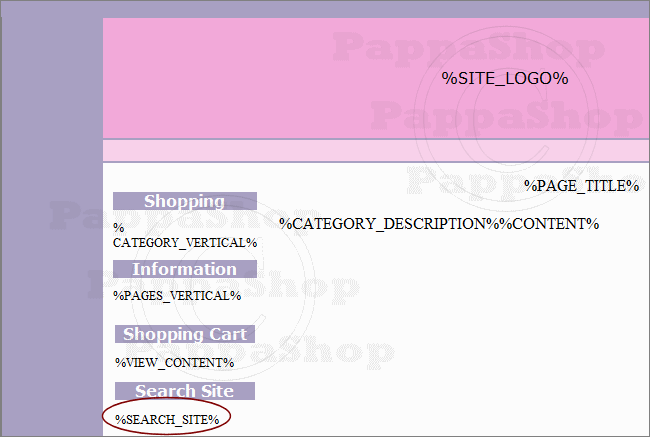
Site Logo (%SITE_LOGO%)
The place holder code for the logo would go in the header portion of the design where ever you want the logo to appear. The actual logo would be uploaded inside the storeadmin area by going to Website / Images / Catalog Images / Update.

Page Title (%PAGE_TITLE%)
This goes where ever you want the title of the page to show up in the design. This will be a text page title by default but you can upload a "header image" for your pages and it will show up where ever this page title code is placed in the design. I generally put this place holder code in the center or left hand side at the top of the content area.

Category Description (%CATEGORY_DESCRIPTION%)
This is the first content place holder code that goes at the top of your content area. This place holder allows for the optional descriptions on catalog category pages to show up on the each category page.
Content (%CONTENT%)
The content place holder code is probably THE most important place holder code. Without it, nothing you put on your site will show up! The content place holder code will go directly after the category description code with no spaces in between just as seen below.

Categories (%CATEGORY_VERTICAL%)
There are quite a few place holder codes that will work for the categories portion of the menu. There are also different ways to set up a menu such as single menu with only the catalog link showing vs. the categories, split menu with categories showing in the "shopping" portion of the menu or categories showing and when clicked, sub-categories showing. There are different place holder codes that you can use for the catalog portion of your menu and different ways to set up a menu. It all depends on what you want to do. You will find a list of category specific place holder codes inside the admin area under Template.
For this tutorial, we will show you how to set up a "split menu" with the categories showing in one portion of it. The place holder code for this part of the menu is %CATEGORY_VERTICAL%.

Pages (%PAGES_VERTICAL%)
What would a website be without informational pages? This place holder code is used for the informational pages of your site so that they show up in your menu. Of course, there are variations just as there were for the categories. For example, if you wanted to split those informational pages into two menus, you would use "groups". For that you would add an _1% or _2% at the end of the place holder code and then assign certain pages to group number 1 or group number 2. For this tutorial, we're not using groups, just a straight forward menu.

Shopping Cart (%VIEW_CONTENT%)
If you are planning on selling products from your site, its a good idea to have a "view cart" link visible on all pages so that a customer can easily get to the cart and do any editing of their order and to check out. If you prefer to use an actual image for your cart link, you would upload that just as suggested above for the site logo.

Search Site (%SEARCH_SITE% or %SEARCH_CATALOG%)
Lots of people like to put a search box on their site so customers can search for items based on keywords they have added when they listed a product for sale. There are two search place holder codes. One covers the catalog pages only (%SEARCH_CATALOG%) and the other covers the entire website (%SEARCH_SITE%).

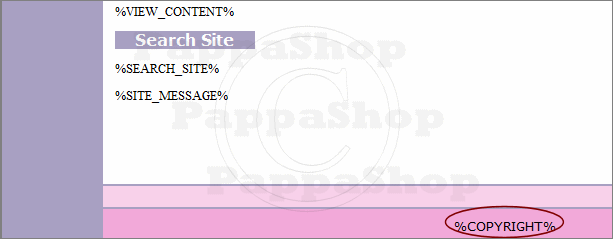
Site Message (%SITE_MESSAGE%)
Some people like to join topsites lists and post link back buttons or add credit card or Paypal images on their site to show that they accept those forms of payment. Usually these are placed somewhere underneath the website's menu. Since not everyone understands html and wants to figure out how to insert snippets of html code into their template, the Site Message works perfectly for this option. To edit the Site Message on the website you would click on Site Settings in the storeadmin. Whatever you put in the WYSIWYG editor there will show up where the %SITE_MESSAGE% code was placed in the template.
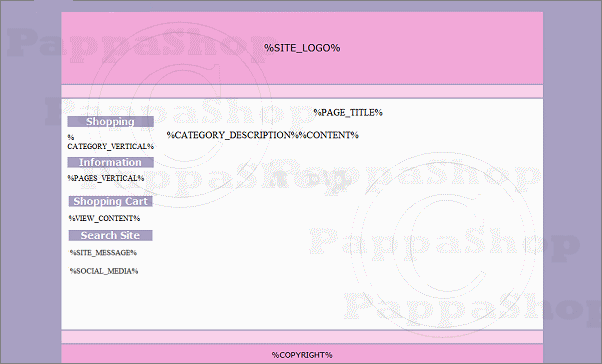
Social Media (%SOCIAL_MEDIA) New!
New in Site Builder version 2.94+ is the ability to add social media icons to your site and control them through the storeadmin. We have placed this code underneath the "Site Message" code so that the social media icons show up underneath the left hand menu.

Copyright & Powered by PappaShop (%COPYRIGHT%)
You may be designing and installing a website for someone else and want to add a link back to your site on the design itself. In that case you would simply write out your info and put your link on the bottom of the design. In order to get the remaining copyright info and required link back to PappaShop on the template, you would use the Copyright Place Holder code. That puts a line of text in automatically based on what the Site Title is in the Site Settings area of the storeadmin, along with the "powered by PappaShop" link. This place holder code is usually placed in the bottom center of the template.

Now the design is complete with all place holder codes and should be ready to actually install. Below is what the entire design looks like complete with codes.

Installation
To "install" a completely coded design, copy all the html for the design and log into the storeadmin and go to Website / Template and click on "Add A Custom Theme" if you aren't already on that page. Highlight all the html code in the box on screen. Then go to your html editor and highlight all the html from your template and copy it. Go to the storeadmin template area and paste the entire htlm code over what is in the box. This will replace the html code in the storeadmin with your own. Then click Update.
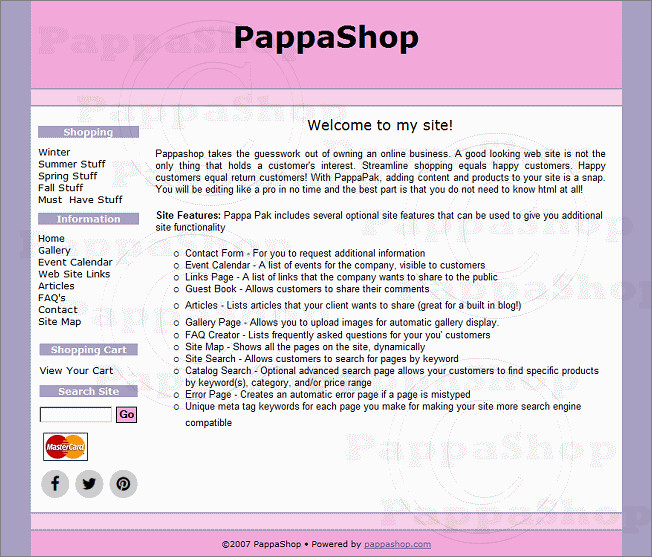
Now you should be able to adjust the fonts and colors with the fonts and colors link on the lower right of the storeadmin and you're good to go! Below is what the above design looks like from the browser's point of view.

Saving A Template
Once you have "installed" the template by pasting in your new code and clicking Update, you will need to save your template. Go to your FTP program or the file manager and go into public_html / template and download the index.htm file. Rename that file what you want to call your template (no spaces or special characters) and then upload that file into that same folder. It should now show up in your template choices under Website / Template. If you do not see it, click on "Select A Standard Template" to get back to that screen.

